


Intro
As a developer, we believe that maintaining multiple code bases doing the same thing is painful, that’s why Jetbrains come up with Kotlin Multiplatform Project, Google with Flutter and Facebook with React Native. Kotlin Multiplatform aim to solve business logic part while the later aim to solve end to end; start from business logic all the way to User Interface. I tried Kotlin Multiplatform before, while it has some limitation with Kotlin Native and Coroutines, it’s working as expected. You can check my article here:
https://medium.com/@fandygotama/kotlin-multiplatform-reactive-a45263e1fd7a
For my next journey, i decided to give it a go with Flutter. Yes i know Flutter has Flutter for Web, why bother using AngularDart? Well, at present Flutter for Web is still in developer preview, and not recommended by Google to use in production. The future is unknown, and we live in the present. So, let’s try using what is available today 😁
If you want to read and do the code at the same time, this article will take about 30 minutes to 1 hour to finish.
Note:
- When reading this tutorial, bold word in between text means that you have to take a closer look.
- Italic sentences are additional informations that you can skip.
Prerequisites
I won’t go into detail explaining about Flutter’s Widget, AngularDart and how reactive programming works, as you easily find all the documentations from Google.
In this tutorial, at least you have:
- Knowledge how Flutter
StatefulWidgetandStatelessWidgetworks, - Already finished AngularDart’s
tour_of_heroestutorial from Google, - Basic Dart programming,
- Basic understanding how Reactive Programming works.
Goal
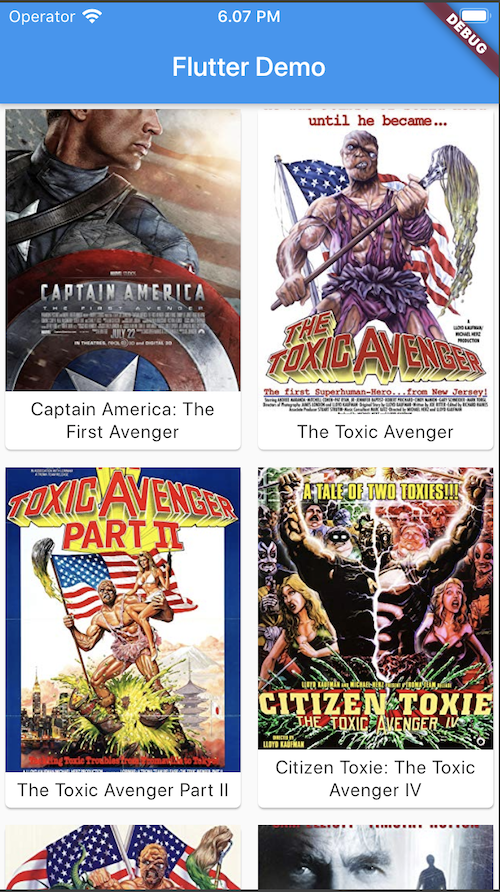
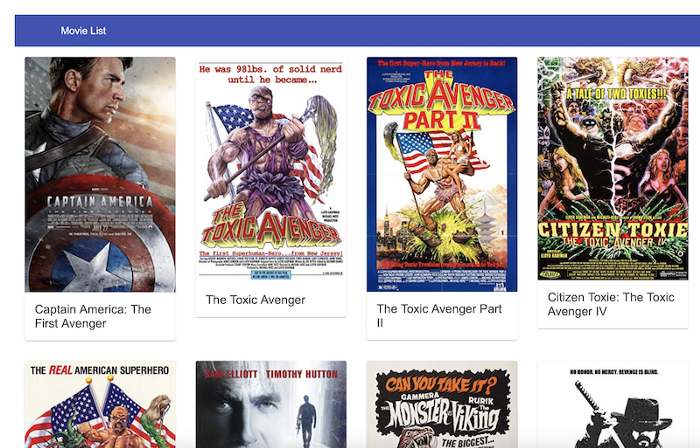
Our goal is to create shareable business logic written in pure dart for Flutter and AngularDart. Our app will make connection to OMDb, get the movie list and show the result in Flutter and Web.
This is our final result.
Approach
This tutorial will use MVVM pattern with input output approach inspired by kickstarters, (https://github.com/kickstarter/native-docs/blob/master/inputs-outputs.md).
Here’s a design diagram how our app structure will be.
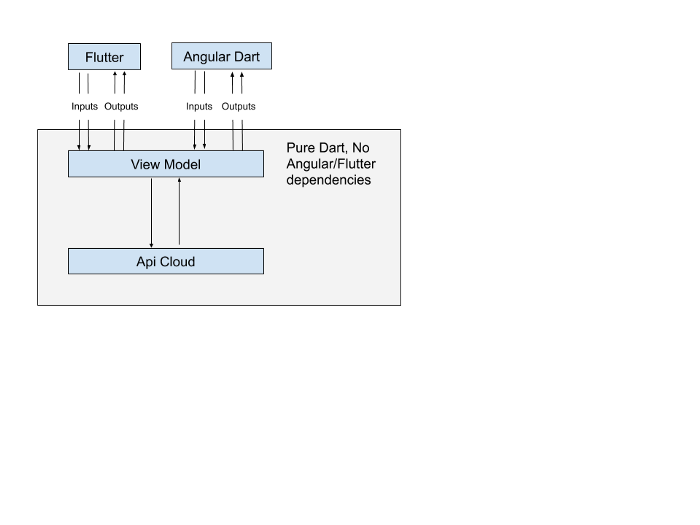
For this tutorial, i’m not using clean architecture approach as it will make the tutorial more complicated than it should be.
Libraries
At the time of writing, i am using the latest version of the following libraries:
Flutter SDK: 1.12.2 dev channel
Dart SDK: 2.7.0
RxDart: 0.22.6
http: 0.12.0+2
AngularDart: 6.0.0-alpha 1
AngularComponent: 0.14.0-alpha 1
IDE
Android Studio 3.5.2 (Flutter)
VS Code 1.40.1 (AngularDart)
Let’s start!
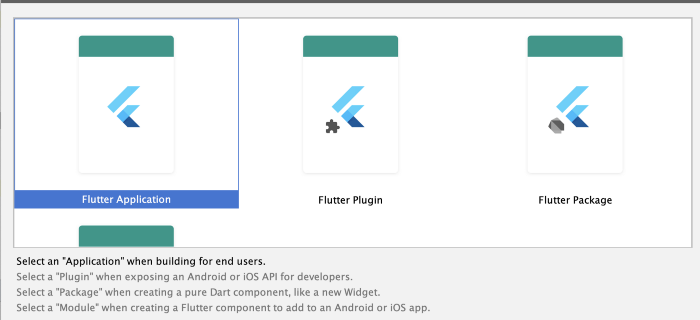
We’re going to use Android Studio to write our business logic. Fire up Android Studio and select New Flutter Project…, and choose Flutter Application
Set project name, e.g.: flutter_shareable and click Next

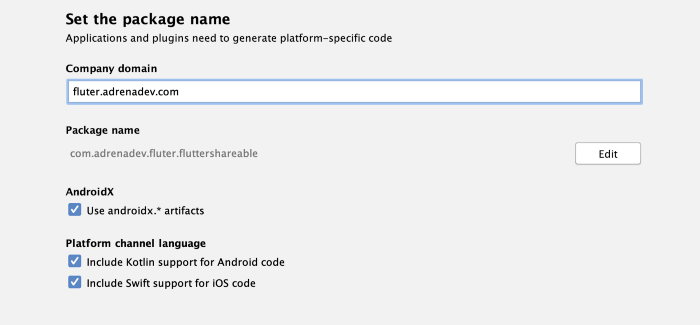
Now set the package name, check AndroidX, Kotlin support and Swiftsupport, and click Finish.
Now that we have Flutter application, we’re going to create the library, select File -> New -> New Flutter Project and select Flutter Package. This will be our Pure Dart implementation.

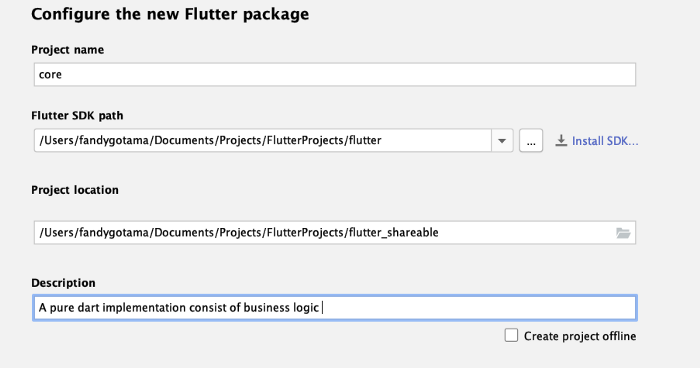
Set project name, e.g.: core, and set project location inside flutter_shareable directory, and click Finish.
Choose your project name for shareable code
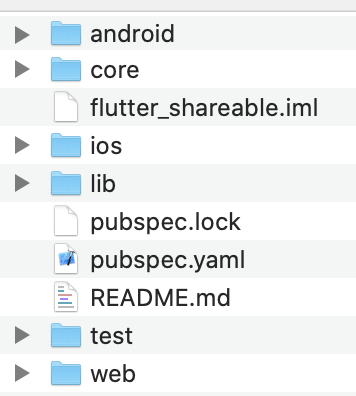
Below is our project directory structure:
Add dependencies into your Flutter’s pubspec.yaml file.
Business Logic
Connecting to cloud service
We will connect to OMDb and get the movie list. API is free, you can get it from here:
https://www.omdbapi.com/apikey.aspx
We are going to search all movies contain avenger keyword with this url: http://www.omdbapi.com/?s=avenger&apikey=xxxxxx
Below are the JSON responses from the API:
Now, lets start preparing our data model.
Open up core directory, remove core.dart and core_test.dart, create new directory called model, and create new file movie.dart
Its recommended to use lowercase and _ when creating Dart file.
Create two new files called mapper.dart and movie_mapper.dart inside lib directory.
How it works
- We start by creating simple model called
Moviemodel, - We prepare transform interface called
Mapper, this interface purpose is simple, to transform JSON String into object model, - We create implementation class called
MovieMapper
Next step, we will get movie list from API using http library. Open up core’s pubspec.yaml, add http as dependencies and remove all flutter dependencies (IMPORTANT).
If you got an error when importing http or other libraries in core’s module, try go to core’s directory and run flutter pub get via terminal manually.
Create 2 files: service.dart and movie_cloud_service.dart
How it works
- We create service interface. This interface purpose is to provide abstraction when called via
ViewModel. You can use this interface to get data from cloud or from local cache (for example), - We create service implementation. In this example we are connecting to OMDb service by providing
apiKeyand search query. The result from http is JSON String, which is then passed to our mapper interface and return an object model; in this case a movie model. - If response is not 200, we simply throw an error.
ViewModel
Now that we’ve finished preparing http service, we’re going to write ViewModel class. This class purpose will be the main gateway to stream data between UI and Service back and forth.
Add RxDart (if you haven’t) dependencies into core’s pubspect.yaml, then create 2 new classes called list_view_model.dart, and get_movie_list_view_model.dart
How it works
- We start by creating ViewModel interface. We prepare 2 inputs:
startandloadMore, and 3 outputs:loading,resultandexception. By only providing this information to our UI platform, we are able to separate the concern and class responsibilities. UI simply call inputs and get the outputs, thats it! - Here lies all business logic to provide data to be displayed by UI. First we assign inputs and outputs variable to this class, assign
_loadingProperty.streamintoloading observableand_exceptionProperty.streamintoexception observable. the code is pretty self explanatory. Now we move to result observable; here we start by getting_startPropertyinput and show loading indicator by calling_loadingProperty.sink.add(true), next we translate our future data we’re getting from service into observable by callingObservable.fromFuture. After that we hide the loading indicator by calling_loadingProperty.sink.add(false). The_loadMorePropertyis pretty much has the same logic, call loading, translate future to observable and hide loading. The only differences is that we set the clearItems variable to false in_loadMoreProperty.doOnDataas we do not want to reset the list during load more scrolling. Last we called merge to merge both streams and return list of movies. - Next we prepare our property using
BehaviorSubject. Why notPublishSubject?, i’ll explain later. - Last we provide
dispose()method and clear all of our property to prevent leak.
observable.sink.add is equivalent with observable.onNext in other reactive language. doOnData is equivalent with doOnNext.
Flutter
Main
Now lets move to our UI, open up main.dart, and remove the default example code, replace with below code:
How it works
- We start by creating
ViewModeland provide all the dependencies needed by theViewModel. You can also use dependency injection to provide theViewModel. - We passed the
ViewModelinto MovieList’s widget.
Creating Movie List Widget
Next we create movie list widget and it’s item widget. Create 2 files called movie_list.dart and movie_cell.dart
How it works
- We use
StreamBuilderto subscribe to our ViewModel’s outputs. In this example we only subscribe into 1 output, that is:widget.viewModel.outputs.result. In real application, we need to also subscribe towidget.viewModel.outputs.exceptionto pass the error message to user, orwidget.viewModel.outputs.loadingto show loading indicator, - If you’re still remember why we’re using
BehaviorSubjectinstead ofPublishSubjectis because our input can start running, even before we subscribe to the output. in this case:widget.viewModel.inputs.startis called first before subscription happens. UsingPublishSubjectwill show empty screen when you load the screen. Try changingBehaviorSubjectintoPublishSubject, remarkWidgetsBindinginsideinitState(), and movewidget.viewModel.inputs.startintoinitState(). You won’t see the movie list in your simulator screen, changing back toBehaviorSubjectwill resolve this issue.
Run your Flutter App and you should see the similar output from our Goal Section.
Do not forget to call dispose() during onDestroy() to prevent memory leak!
AngularDart
Now let’s work on AngularDart. clone the quickstart project from Google repo:
https://github.com/angular-examples/quickstart/tree/master
copy to flutter_shareable project and rename it to angular
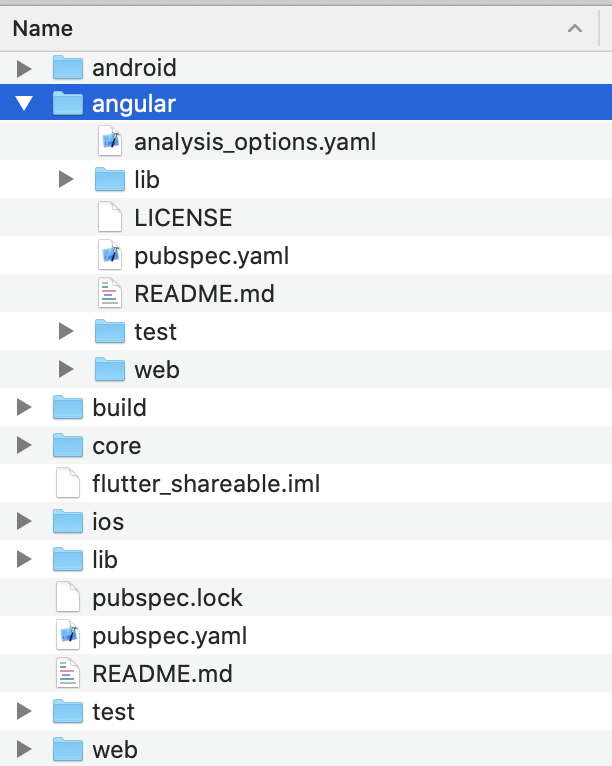
Your directory structure should be like this:
Open up VS Code, and select angular directory (do not select flutter project), openpubspec.yaml, addcore library, and update all dependencies to the latest version.
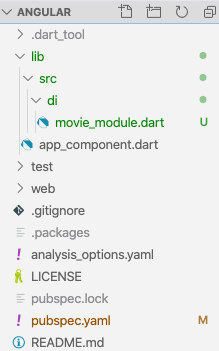
Next, we will provide our ViewModel via Angular’s dependency injection. Create a new directory called src and di as subdirectory, add new file called movie_module.dart
Now, open app_component.dart, and add the following code:
How it works
- We create dependency module class and provide all implementations needed by
GetMovieListViewModel, - We put all providers into the list, first we provide
http.ClientandMovieMapperalong with key and host information because ourCloudMovieServiceneed that information. Next we useFactoryProviderto provide Service andViewModelrespectively, - We inject
ViewModelintoAppComponentconstructor. - Inside
ngOnInitwe start subscribing toviewModel.outputs.resultandviewModel.outputs.loading, and pass the result intoList<Movie>movies andbool loading, which will be used byapp_component.html, - after subscription we start searching movie list called avenger,
- We dispose our subscription during
ngOnDestroy()
viewModel.outputs.result.listen is equivalent to viewModel.outputs.result.subscribe(onNext:) in other reactive languages.
AngularDart provide AsyncPipe to work on Observable. However during testing, using AsyncPipe caused my html page to run in infinite loop. After doing some research (with google of course), i’ve found out this article explaining why it happens. This article is in Japanese, however you can use google translate like i did 😁
Thats why i decided to not use AsyncPipe and listen to Observable manually.
HTML & CSS
This is not my expertise as i haven’t touched both for a very long time, however to complete this tutorial lets continue.
Create app_component.css inside lib directory
And create app_component.html in the same directory.
How it works
- We are using standard css styling for creating a movie list,
- in HTML we check loading variable using
ngSwitch, if its true, show loading text, otherwise show default text, - Next we loop over movies and display the information to our user.
Run using webdev serve, and you should see the layout as displayed in our Goal section.
If you’re getting build error after updating dependencies, simply close the webdev, run webdev build and then re-run webdev serve.
Conclusions
Code sharing between platform is the future. If you follow my Kotlin Multiplatform tutorial you should see the same exact business logic in ViewModel using Reactive approach, i believed somewhere in the near future, we could make this perfect and become benefit for everybody.
This tutorial may become obsolete when Flutter for Web is ready for production use, but until then, i hope this will help you to achieve single code base, multi platform.
Least but not last, code is available here: