
Intro
Recently we’ve got a project to create an app with API sits on Kubernetes Service. As a startup company, we don’t have any infrastructure guy (we don’t think it’s necessary at this moment 😃), and nobody in our team has any experiences setting up Kubernetes on cloud. Based on that, I’ve decided to give it a try during my weekend.
I’m coming from mobile apps background with minimal experience on how to setup docker and any related infrastructure things, so first things I tried like any developers out there, I googled it. Yes, there are a lot of tutorials covering some parts of the goal that I want to achieve, but I haven’t found out any that covering end to end journey starting from building REST API, build into Docker and push into Kubernetes Cluster. I spent 2 days trying to make this works, and now I’m going to summarise all my learnings and share it with you and make your API up and running within 40–50 minutes long!
Prerequisites
This tutorial is intended for beginner back-end developer who wants to build API and deploy it into the cloud with the following prerequisites:
- Understand how REST API works,
- Basic experience in Kotlin,
- Basic understanding of how Docker and Kubernetes works.
Goal
Our goal is to make our REST API up and running in Azure Kubernetes Service and can be accessed from anywhere. This tutorial will cover all the following subjects :
- Creating REST API using Spring Boot Kotlin,
- Build the package into a docker image,
- Run the API locally,
- Setting up Azure,
- Push Docker Image to Azure Container Registry,
- Creating Kubernetes Cluster on Azure,
- Setting up MySQL on Azure,
- Deploy image to Kubernetes Cluster,
- Update REST API,
- Redeploy to Kubernetes Cluster.
Azure provides a free 30 days trial which is very helpful for us to run and test this tutorial for free 🥳
Libraries
For this tutorial I’m using:
- Spring Boot 2.2.2
- Gradle 6.0.1 using Kotlin Script
- Azure CLI
- Docker Desktop 2.1.0.5
- JDK 1.8
- MacOS Catalina
IDE
- IntelliJ IDEA Community Edition (Free)
Now that you’ve downloaded everything we needed, let’s start right away!
Creating REST API using Spring Boot Kotlin
Go to Spring Initializr to bootstrap our first kotlin project by visiting:
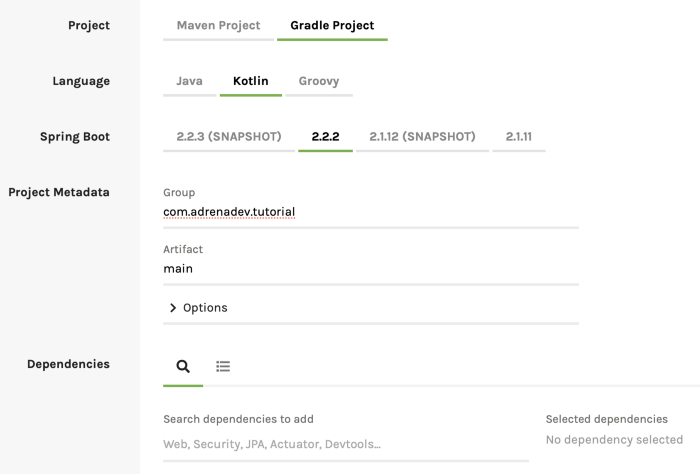
Create Gradle Project, with Kotlin as Language, create package name, in this example: com.adrenadev.tutorial and set main as Artifact. Click the Generate button at the bottom left of the screen.
Extract and copy the downloaded directory into your project directory. Rename main directory into springboot-tutorial
Next, open IntelliJ IDEA, and select Import Project, and then choose springboot-tutorial and click Open
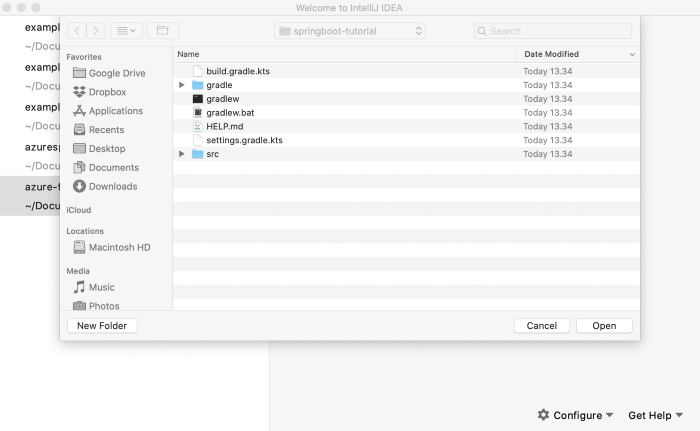
Next, choose Create project from existing sources, click Next. On the next screen, you can change the project name, or just leave it as default, and click Next to continue, and click Finish.
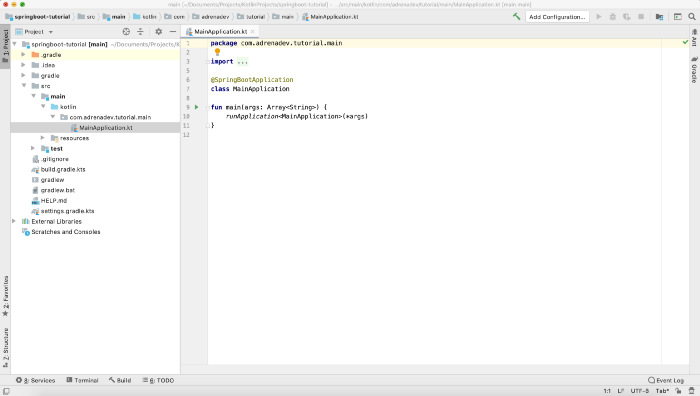
After creating the project, IntelliJ IDEA will ask you if you want to Import the Gradle project. Click the Import Gradle Project button.
Your project will look something like this
How it works
- We start by opening Spring Initializr and bootstrapping our project,
- Next, we import our project into IntelliJ IDEA.
Updating build.gradle.kts
Now open build.gradle.kts and add kotlin plugin.jpa inside plugins
And then add update your dependencies by adding spring-boot-starter-data-jpa, spring-boot-starter-web, jackson, mysql-connector-java
Next add developmentOnly script inside your build.gradle.kts
How it works
- We add
plugin.jpainto gradle script. we will use JPA in our kotlin data class to generate MySQL table automatically, - We also add
spring-boot-starter-web. This dependency is useful for building REST API using Spring MVC, - Next, we add
Jacksonconverter to convert our data class into JSON String, - and the last one we add MySQL connector which is self-explanatory.
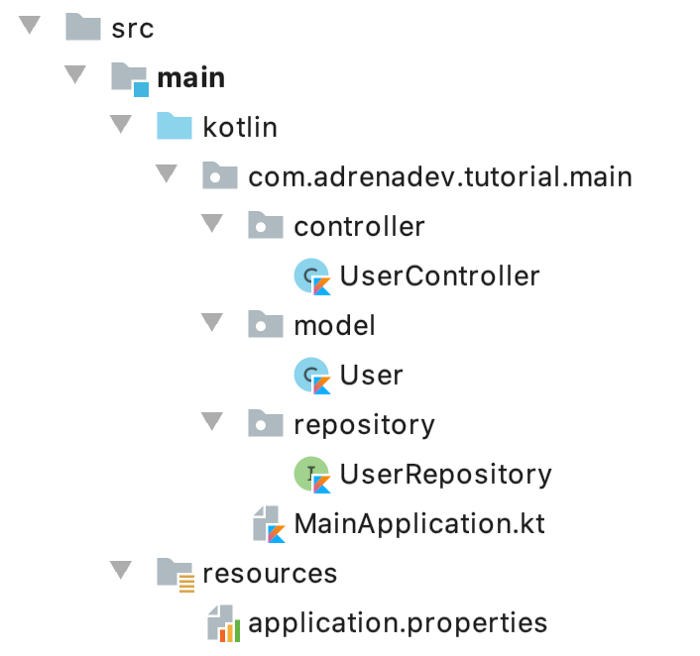
Creating projects
Now let’s create our data model, create a new package called model inside com.adrenadev.tutorial.main and add a new file called: User
Create another package called repository inside com.adrenadev.tutorial.main and add a new file called: UserRepository
Now let’s create another package called controller inside com.adrenadev.tutorial.main and add a new file called: UserController
This is the final directory structure.
How it works
- We created
Userdata model which containsnameandphonedata. We use@Entityto set table name and@Id @GeneratedValuesto markidas auto-increment value in our User Table, - Next we create an interface called
UserRepositoryextendingJpaRepository. By extending JpaRepository we are able to get CRUD functionality by default, - Last we created
UserControllerand add our first REST API that is: creating user. We use@Autowiredto inject UserRepository into the controller.
Updating application.properties
In application properties lies all spring settings that we want to use in our app. In this example is our database config.
Go to the resources directory and create a new file called application-docker.properties, and add the following config
And update the application.properties file
How it works
- We add a new settings file called
application-docker.propertiesand set our database config there, - We update
application.propertiesfile to point todocker
As you might already noticed that we can create application-xxx.properties as many as we want. Spring can recognize the properties name after the dash, in this example: docker.
Let’s try to build our project, first remove MainApplicationTests inside test package. Yes, I know this is bad 😅, but we don’t need it right now and it will make our build failed. Next, go to your terminal and navigate to your project dir and run
./gradlew clean build
and then run below script to separate dependencies and application resources in a Spring Boot fat jar file:
mkdir -p build/dependency && (cd build/dependency; jar -xf ../libs/*.jar)Important: Always clean and re-run mkdir after updating your code.
And we’re done, next, we’re going to use docker to test our API implementation.
Build the package into docker image
Create a new file called Dockerfile in springboot-tutorial directory, add the following script
Create another file called docker-compose.yml in springboot-tutorial directory, add the following script
Open up a terminal, and go to your project directory and type docker-compose up
Note: This may take some time depending on your internet connections.
If successful, your docker windows should show something similar to this

Verify if your images running successfully by typing:
docker psYou will see your active containers list just like the image below

How it works
- We started by creating
Dockerfile. For our JDK we are usingopenjdk:8-jdk-alpine. This image is much smaller than most distribution base images (~5MB) - Next, we copy our
BOOT-INFandMETA-INFdirectory into app file, - We put our main classes
MainApplicationKtintoENTRYPOINT, do note that we useMainApplicationKtinstead ofMainApplication - Next, we created our
docker-compose.ymlfile and set our API image name called:adrenadev-tutorial:latest, set default port to8090and set the default volumes for API, - On build part, we set the context to. (context is relative part where Dockerfile resides) and the name of Dockerfile we’ve created,
- Our API depends on MySQL, thus we put
depends_on: db, so it should always run MySQL when we run the API Server, - We set the networks to
backendfor communication with MySQL, - Next, we set up a database, we will use MySQL 5.7 as most of the cloud are still using MySQL 5.7,
- We set default ports to
33066to outside, - We setup MySQL config (must be the same with the one we used in
application-docker.properties), - Last, we set up MySQL volumes directory and networks.
Run the API locally
Now open up a terminal, and test our API
curl -X POST http://localhost:8090/api/users -H “Content-Type: application/json” -d “{\”name\”:\”Fandy Gotama\”,\”phone\”:\”+62816521323\”}”
Your REST API should response:
{"id":1,"name":"Fandy Gotama","phone":"+62816521323"}
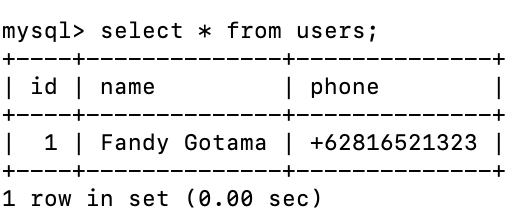
Verify if your data has been inserted to MySQL by running below command (step by step):
docker exec -it yourmysqlcontainerid bash
mysql -u root -p
Enter password: root
mysql> show databases;
mysql> use adrenadev_tutorial;
mysql> select * from users;
Your user’s table should contain 1 record.
How it works
- We run curl to make sure that our REST API is running properly,
- We check our MySQL database inside the docker container to see if our API has been successfully inserted user data into the user table.
Now that we have successfully run our API inside a docker container, next we will set up Kubernetes on Azure.
Setting Up Azure
Start by registering your account in Azure
https://azure.microsoft.com/en-us/
and then download Azure CLI from this url:
https://docs.microsoft.com/en-us/cli/azure/index?view=azure-cli-latest
Open up your terminal and type
az login
Choose Azure subscription ID
az account set -s <YourSubscriptionID>
Create a resource group for the Azure resources used in this tutorial
az group create --name=adrenadev-tutorial-group --location=eastus
Create a private Azure Container Registry in the resource group. This tutorial will push the above Docker Image to this registry.
az acr create --resource-group adrenadev-tutorial-group --location eastus --name adrenadevtutorialregistry --sku Basic
How it works
- We set up an account in Azure,
- We install Azure CLI so that we can use Azure command in our Terminal,
- We login to Azure via Terminal and create Resource Group and Container Registry.
Push docker image to Azure Container Registry
Add com.google.cloud.tools.jib inside your build.gradle.kts plugins
Add jib script to send Docker Image to Azure Container Registry
adrenadevtutorialregistry is our private Azure container registry we’ve created before, and adrenadev-tutorial:1 is our Docker Image.
Click Apply Context to update your build.gradle.kts
Now login to your Azure Container Register
az acr login -n adrenadevtutorialregistry
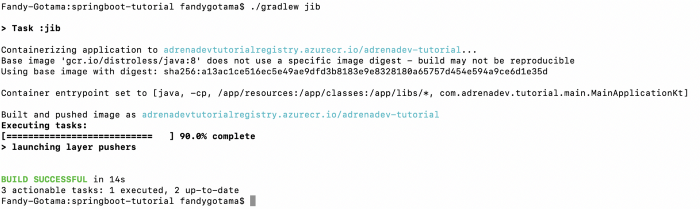
Next, navigate to your project directory, and we will push the image into the registry with Gradle in one command
./gradlew jib
If successful, you should get a build successful message.
How it works
- We updated our
build.gradle.ktsto add jib plugins from Google. Jib plugins allow you to build a container image and deploy it to your favorite cloud service, - We add jib image location in Azure Container Registry and set default image tag to 1,
- We push Docker Image into Container Registry by calling
./gradlew jib
Creating Kubernetes Cluster on Azure
Create Kubernetes Cluster by typing this command
az aks create --resource-group adrenadev-tutorial-group --name adrenadev-tutorial-cluster --node-count 1 --enable-addons monitoring --generate-ssh-keys
This operation may take a while to complete.
When you’re using Azure Container Registry (ACR) with Azure Kubernetes Service (AKS), you need to grant Azure Kubernetes Service pull access to Azure Container Registry. Run the following script to grant AKS access to ACR.
# Get the id of the service principal configured for AKS    CLIENT_ID=$(az aks show -g adrenadev-tutorial-group -n adrenadev-tutorial-cluster --query "servicePrincipalProfile.clientId" --output tsv)# Get the ACR registry resource id
ACR_ID=$(az acr show -g adrenadev-tutorial-group -n adrenadevtutorialregistry --query "id" --output tsv)# Create role assignment
az role assignment create --assignee $CLIENT_ID --role acrpull --scope $ACR_ID
Install kubectl using Azure CLI.
az aks install-cli
Download the cluster configuration information so you can manage your cluster from kubectl.
az aks get-credentials --resource-group=adrenadev-tutorial-group --name=adrenadev-
az aks get-credentials --resource-group=adrenadev-tutorial-group --name=adrenadev-tutorial-cluster
How it works
- We started by creating a Kubernetes Cluster in Resource Group called
adrenadev-tutorial-groupandadrenadev-tutorial-clusteras a cluster name. In this tutorial we only set 1 node, however, in production it is recommended to set at least 3 nodes. - Next, we grant Azure Kubernetes Service pull access to Azure Container Registry,
- Last, we install kubectl and download the configuration.
We’ve done setting up Kubernetes Cluster, next lets setup MySQL
Setting up MySQL on Azure
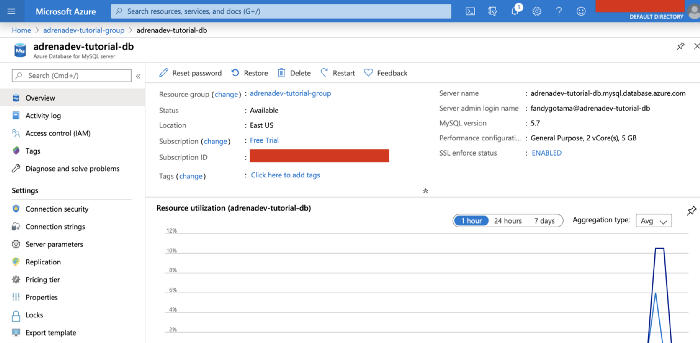
Open up your terminal, and run this command
az mysql server create --resource-group adrenadev-tutorial-group --name adrenadev-tutorial-db --location eastus --admin-user fandygotama --admin-password vzeN_.nn]P9[k]DaMF:$ --sku-name GP_Gen5_2 --version 5.7
This operation may take a while to complete.
Next, we’re going to setup VNET to only allow access to MySQL from our Kubernetes Cluster. Open up https://portal.azure.com, and navigate to adrenadev-tutorial-db and click on Connection security
Click Adding existing virtual network and enter VNET Information in fields provided.
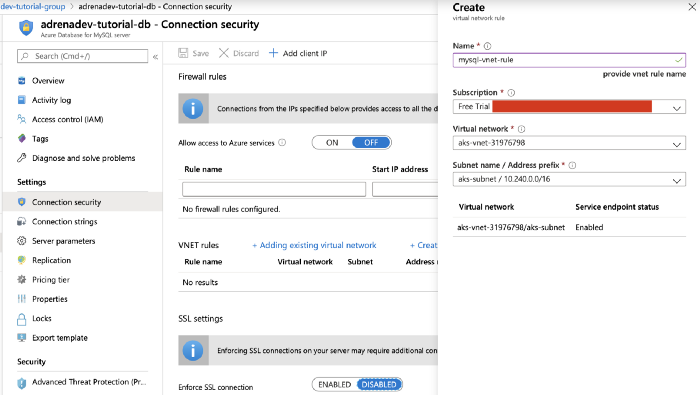
Enter mysql-vnet-rule for VNET name, select your Subscription, Virtual network and Subnet name from the dropdown list, and click Enable toactivate Service endpoint, and click Create to create Virtual Network.
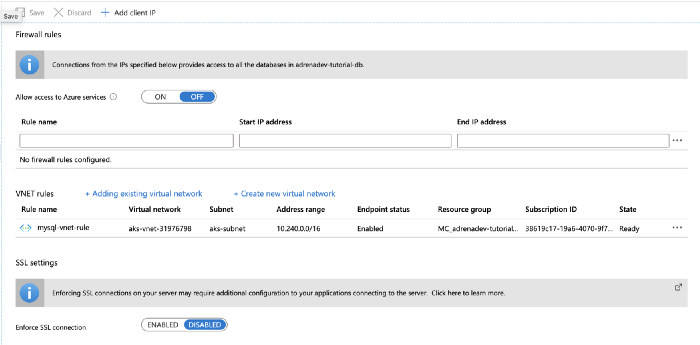
Next, Disable SSL connection in SSL settings and click Save.
For the sake of simplicity, we’re disabling SSL connection in this tutorial. It’s however recommended to turn on this setting in the production environment.
Below is the VNET settings summary we have configured.
How it works
- First, we started by creating MySQL instance on Azure. We set Resource Group as well as MySQL username and password. SKU Name parameter consists of 3 parts: Tier (B for Basic, GP for General Purpose, MO for Memory Optimized), Compute (Gen4 or Gen5) and Scale (1–32 vCores). In this tutorial we’ve setup General Purpose Tier, using Gen5 and 2 vCores.
- Next we setup VNET (Virtual Network) from Azure Portal to allow access only from our Kubernetes Cluster,
- We also disable SSL Connection to simplify the process.
You can see more detailed on sku-name options in this link
Deploy image to Kubernetes Cluster
Now after we set up MySQL and Kubernetes Service, we need to update our database config in our project. Create a new resource called application-azure.properties and update the following database config.
Change application.properties to point to azure
Rebuild your code by running gradle commands
./gradlew clean build
./gradlew jib
if you get an error when deploying the image to a registry, it is probably that your session has already expired, re-login to registry using this command:
az acr login -n adrenadevtutorialregistry
and rerun jib.
Next, we deploy the image with kubectl
kubectl run adrenadev-tutorial --image=adrenadevtutorialregistry.azurecr.io/adrenadev-tutorial:latest
Now, expose Kubernetes Cluster externally by using kubectl expose command.
kubectl expose deployment adrenadev-tutorial --type=LoadBalancer --port=80 --target-
kubectl expose deployment adrenadev-tutorial --type=LoadBalancer --port=80 --target-port=8080
Once the app deployed, query the external ip address:
kubectl get services -o jsonpath {.items[*].status.loadBalancer.ingress[0].ip} --namespace=default
and let’s try accessing our REST API using curl or Postman
curl -X POST http://52.188.47.148/api/users -H “Content-Type: application/json” -d “{\”name\”:\”Fandy Gotama\”,\”phone\”:\”+628111111111\”}”
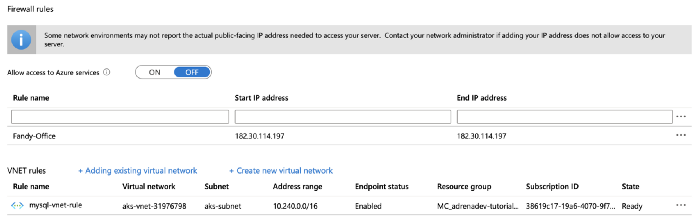
And that’s it, you can check if your User record has been successfully inserted into MySQL by inserting your public IP into Firewall Rules
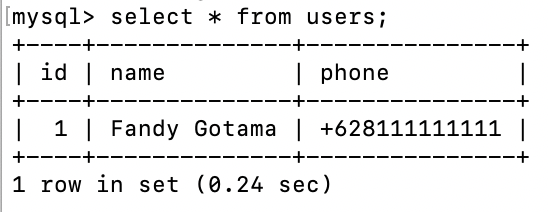
Connect to MySQL using terminal
mysql -u fandygotama@adrenadev-tutorial-db -h adrenadev-tutorial-db.mysql.database.azure.com -p
Enter password: vzeN_.nn]P9[k]DaMF:$
mysql> show databases;
mysql> use adrenadev_tutorial;
mysql> select * from users;
Your user’s table should contain 1 record.
How it works
- We started by updating
application-azure.propertiesto include Azure MySQL settings, - We set an active profile to
azure, - Next, we rebuild our project and push jib to the registry,
- We deploy our image to Kubernetes Cluster,
- Next, we expose our Kubernetes Cluster to the public and get public IP,
- Last, we run our REST API and check our User data in MySQL Azure.
Just like any other development cycle, we need to always update our API, test in the local environment, and re-deploy it to Kubernetes Cluster. The section below describes how to do that.
Update REST API
Now let’s add the rest of CRUD API into our UserController
Set back spring profile to docker
Rebuild your project by running gradle command:
./gradlew clean build
Recreate build/dependency by running this command:
mkdir -p build/dependency && (cd build/dependency; jar -xf ../libs/*.jar)Rebuild your Docker Image, and re-run docker-compose up
docker-compose build --no-cache
docker-compose up -d
Check your updated REST API, try getting a list of users by running this command:
curl http://localhost:8090/api/users -H “Content-Type: application/json”
If built correctly, you should see a list of users response
[{"id":1,"name":"Fandy Gotama","phone":"+62816521323"}]
How it works
- We add new functionalities to our
UserControllerto get list of users, get user by id, update and delete it, a full CRUD service, - We rebuild the project use docker to test our service locally.
Redeploy to Kubernetes Cluster
The last step in this tutorial is updating our API to Azure. The process is a bit different between updating and first-time deployment of your image.
Change back your application.properties back to azure.
Run gradle clean build and jib to put your image into registry:
./gradlew clean build
./gradlew jib
Update your image tagging inside jib script in your build.gradle.kts
Always update your jib image tag before deploying the image to Azure.
Now run set image command via kubectl:
kubectl set image deployments/adrenadev-tutorial adrenadev-tutorial=adrenadevtutorialregistry.azurecr.io/adrenadev-tutorial:latest
Now if you type:
kubectl get pods
You will see a new pod is being created replacing the old one.

Wait a bit and you should see your new pod is ready

Now let’s try running our REST API in Azure
curl http://52.188.47.148/api/users -H “Content-Type: application/json”
You should see user list response
[{"id":1,"name":"Fandy Gotama","phone":"+628111111111"}]
That’s it! 🥳
Don’t forget to delete all your resources after finishing this tutorial to avoid being charged by Azure.
Summary
We’ve done so much, starting from setting up Spring Boot Kotlin, deploying image using docker-compose, and deploying Docker Image to Azure Kubernetes Service. We also learn how to update our REST API and redeploy it to the localhost and Azure.
I hope this tutorial is useful for any developers who just start learning back-end out there. Thank you.
You can check the source code from my GitHub
https://github.com/gotamafandy/SpringBootKotlinAzure
References
https://medium.com/hacktive-devs/build-restful-web-services-with-spring-boot-and-kotlin-8190bd156722
https://hub.docker.com/_/openjdk